
GitOps is a modern twist on DevOps that prescribes one or more Git repositories as the “source of truth” for the declarative state of your environment(s) and applications. In GitOps, all environment and application configuration is stored as code and actioned upon to change the state of the environment/application accordingly. In this post, we’ll explore how you can get started with this concept and try GitOps out for yourself on a local test cluster.
Create a Local Kind Cluster
Kind (Kubernetes In Docker) is a local cluster tool under a Special Interest Group (SIG) in the Kubernetes project space. Kind was developed by Kubernetes engineers for testing Kubernetes itself and uses Docker containers as cluster nodes. It’s very straightforward and lightweight to set up. There are many good alternatives to Kind as well, but for this example, we’ll stick with Kind and walk you through a basic cluster creation.
See the Kind installation documentation for help installing the ‘kind’ and ‘kubectl’ binaries for your respective operating system.
Once you’ve installed those required applications and their dependencies (e.g., Docker), we can begin creating our GitOps test cluster.
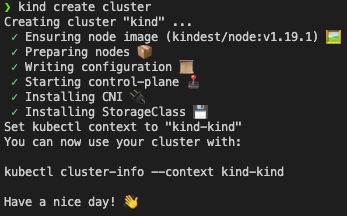
kind create cluster
That’s it! This command will download the latest Docker containers from DockerHub and configure a basic Kubernetes cluster with them. In just a few moments (depending on your Internet speed and whether you already have the containers cached) you should have a running cluster and see output similar to this:
You can see your running Docker containers by running the following command:
docker ps
![]()
Let’s try a few commands in our cluster to take a look around:
kubectl config view
kubectl get nodes
kubectl get namespaces
kubectl get all --all-namespaces
That should give you a very introductory level of familiarity with Kind and how to create a local Kubernetes cluster for testing.
Install ArgoCD
ArgoCD is a very popular Cloud Native Computing Foundation (CNCF) GitOps project. It facilitates declarative definitions of environment, application, and configuration as code by serving as a Continuous Delivery (CD) tool, constantly reconciling the state of your environment and applications with the latest code in your Git repositories.
Let’s install ArgoCD into our Kind cluster. For more detailed instructions, take a look at the ArgoCD Getting Started guide.
Note: if you run into issues with this section, you may need to check your Docker settings to ensure you have enough memory and CPU allocated to your Docker runtime (see “Resources” in the Docker Desktop User Manual).
kubectl create namespace argocd
kubectl apply -n argocd -f https://raw.githubusercontent.com/argoproj/argo-cd/stable/manifests/install.yaml
Next, we need to patch the ArgoCD service to change it to type ‘LoadBalancer’.
kubectl patch svc argocd-server -n argocd -p '{"spec": {"type": "LoadBalancer"}}'
We won’t bother with configuring an Ingress for this exercise as we’ll be blowing away this cluster when we’re done, but for a long-lived installation, you would want an easier way to access ArgoCD. For now, we’ll port forward to ArgoCD but first, we need the admin password (the name of the argocd-server pod by default).
kubectl get pods -n argocd -l app.kubernetes.io/name=argocd-server -o name | cut -d'/' -f 2
kubectl port-forward svc/argocd-server -n argocd 8080:443
Browse to http://localhost:8080 to access the ArgoCD application. Login as user “admin” with the password being the result of the previous command – the argocd-server pod name. ArgoCD also includes a binary Command Line Interface (CLI) that is extremely handy, but we will not discuss it in this post, though I greatly encourage you to try it out!
A Sample GitOps Application with ArgoCD
Deploying
If all has gone well up until this point, you should be logged in to ArgoCD and ready to deploy your first application using GitOps! ArgoCD has a sample GitHub repository with many different types of sample applications. Follow the instructions on the ArgoCD Getting Started guide starting with Creating Apps Via UI.
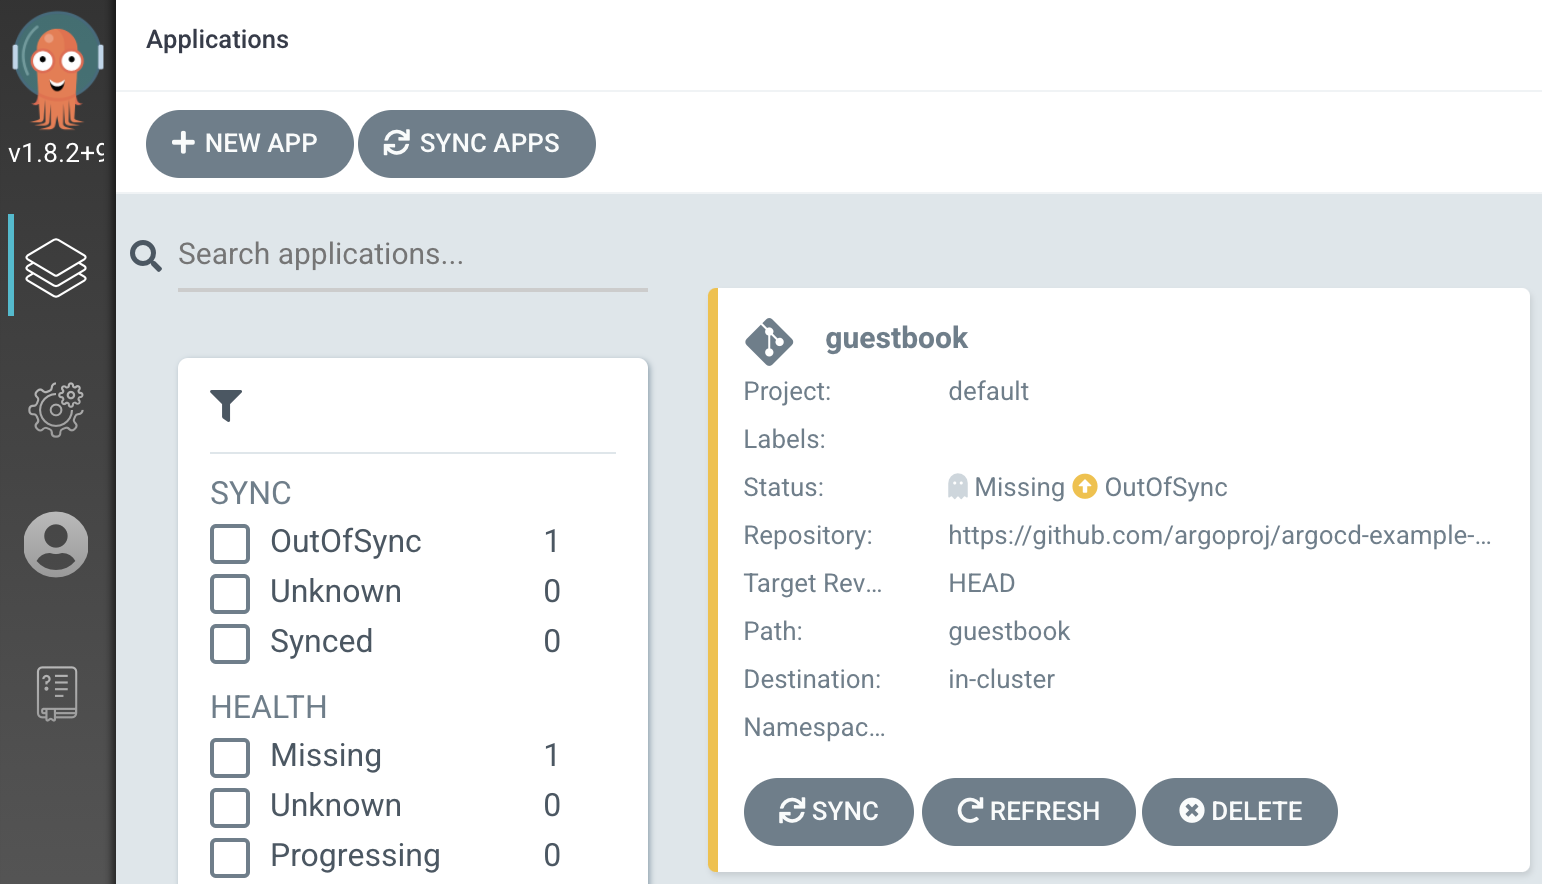
Click the “Sync” button to deploy your Guestbook app to your local Kind cluster.
Congratulations! You should have a successfully deployed Guestbook application in your cluster’s default namespace, deployed using GitOps CD!
To access the sample Guestbook application you’ll need to port forward to the new guestbook-ui service that was created in the default namespace.
kubectl port-forward svc/guestbook-ui 8888:80
Modifying the Deployment – Imperatively
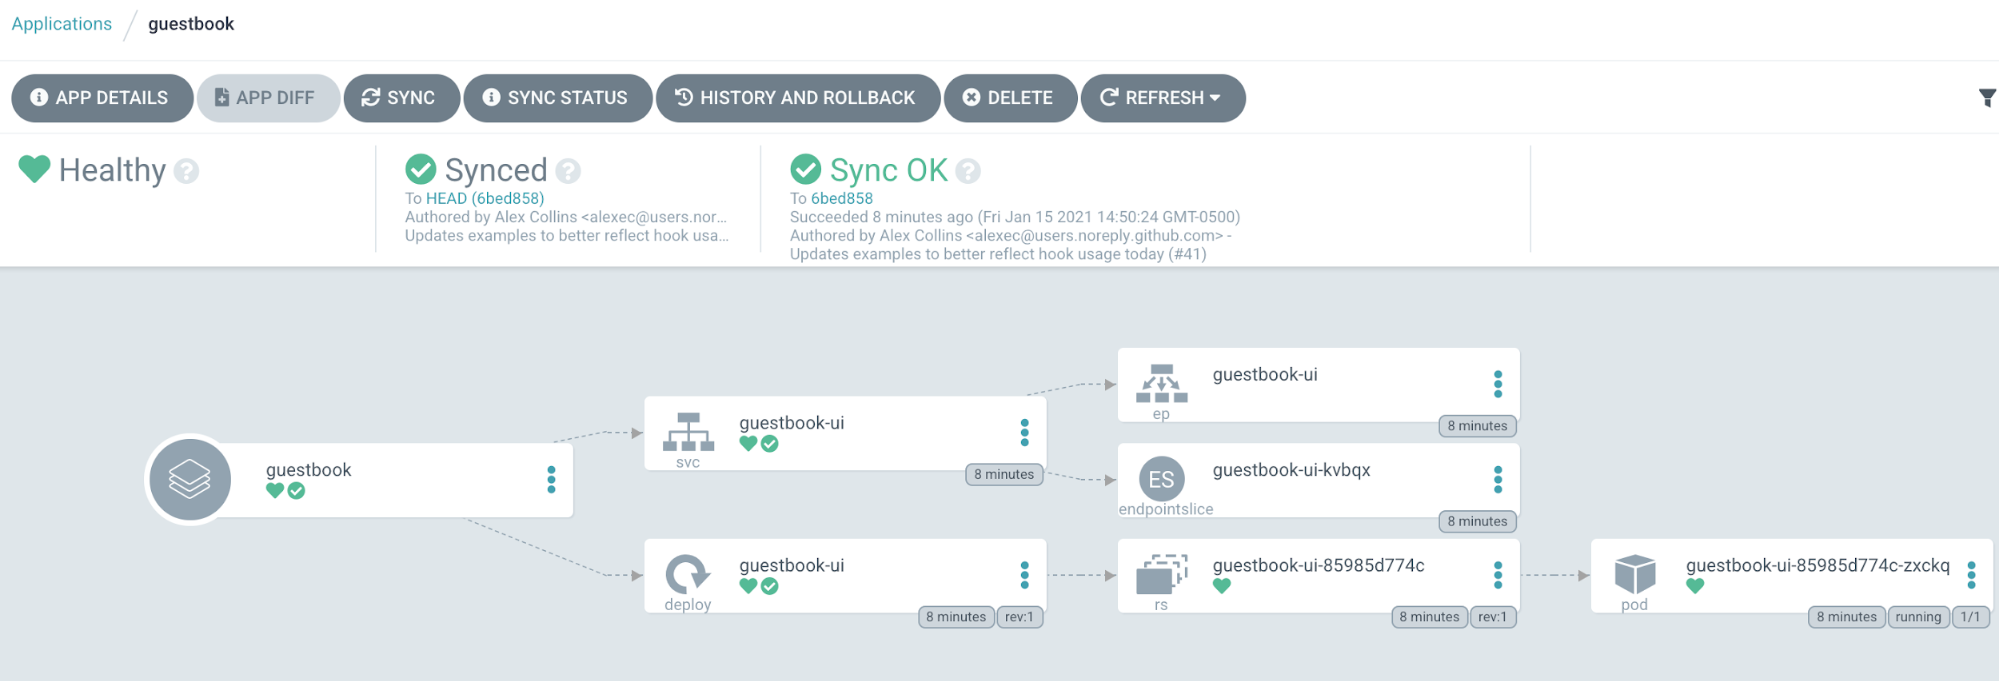
Browse to http://localhost:8888 to see the Guestbook application in action. Let’s take a closer look at what ArgoCD did for us. The Guestbook folder in the sample repository contains two files, a guestbook-ui-deployment.yaml file and a guestbook-ui-svc.yaml file.
Opening the former, we see the following:
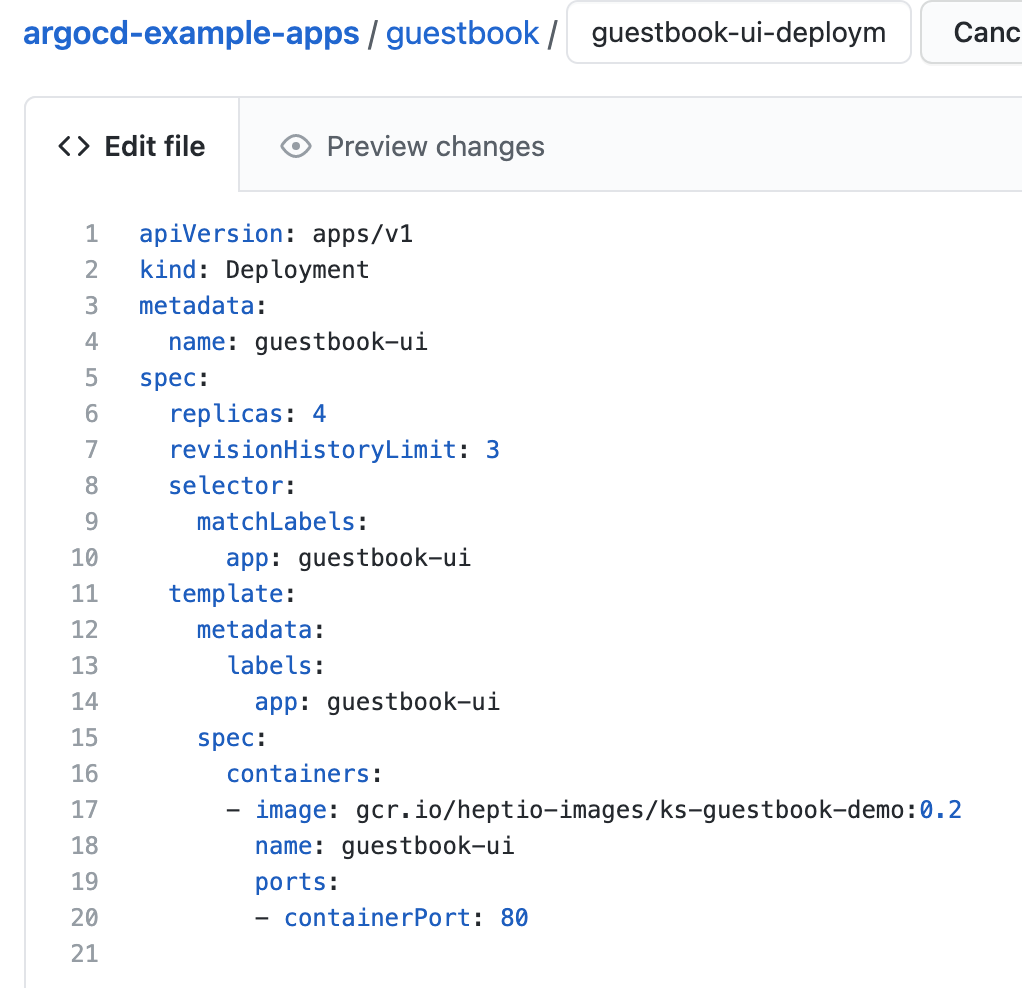
- apiVersion: apps/v1
- kind: Deployment
- metadata:
- name: guestbook-ui
- spec:
- replicas: 1
- revisionHistoryLimit: 3
- selector:
- matchLabels:
- app: guestbook-ui
- matchLabels:
- template:
- metadata:
- labels:
- app: guestbook-ui
- labels:
- spec:
- containers:
- image: gcr.io/heptio-images/ks-guestbook-demo:0.2
- name: guestbook-ui
- ports:
- containerPort: 80
- containers:
- metadata:
This is a pretty straight-forward Kubernetes Yaml manifest definition for a deployment. Note that we are deploying the ks-guestbook-demo container with the “0.2” tag. Additionally, ArgoCD can also manage Helm, Jsonnet, Kustomize, the now-defunct Ksonnet, and even custom configuration management plugins.
What would we need to do if we wanted to scale our Guestbook application now? We could use kubectl to imperatively scale our deployment on the command line like so:
kubectl scale deployment guestbook-ui --replicas=3
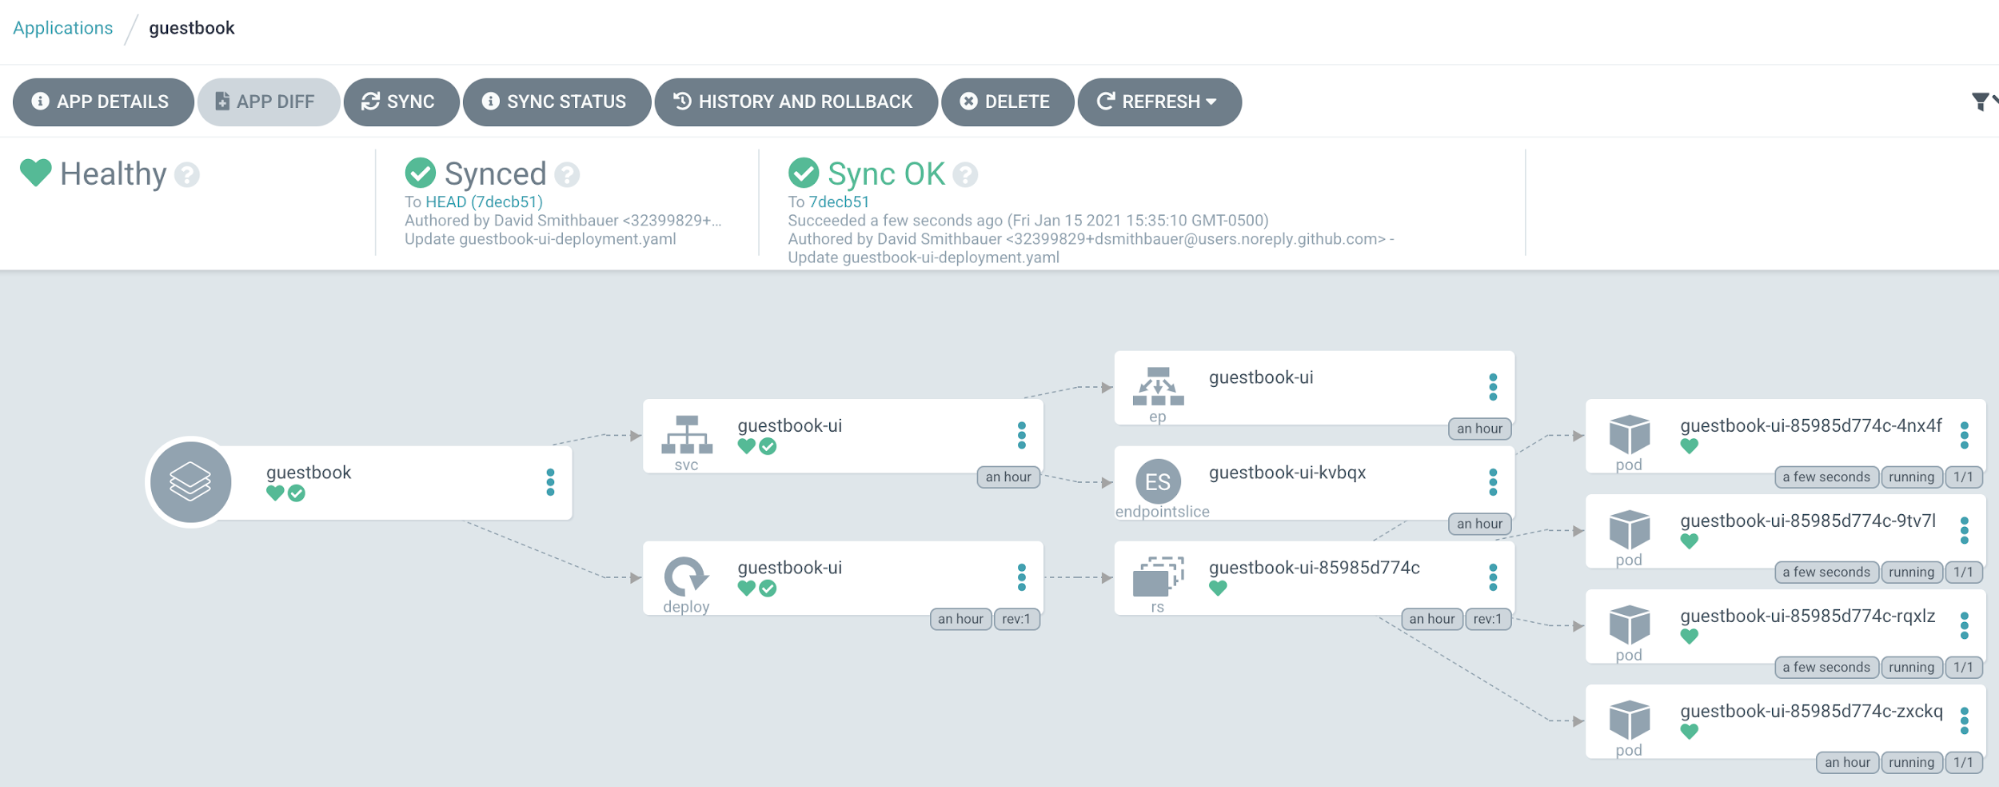
That worked. But, if we take a look at ArgoCD again, we see that our application reports that it is “OutOfSync”. What does that mean? Well, we said earlier that GitOps uses our Git repository as the “source of truth.” Since we used an imperative command to modify our deployment instead of editing the configuration declaratively, we are no longer in sync with our repository configuration. Being out of sync means we have “drifted” from that true state as declared in our repository. In GitOps, and with most legacy environments, drift is a bad thing. It represents all the changes that aren’t captured anywhere. If we needed to rebuild this environment somewhere else, we’d be missing the information to build it exactly as it was before.
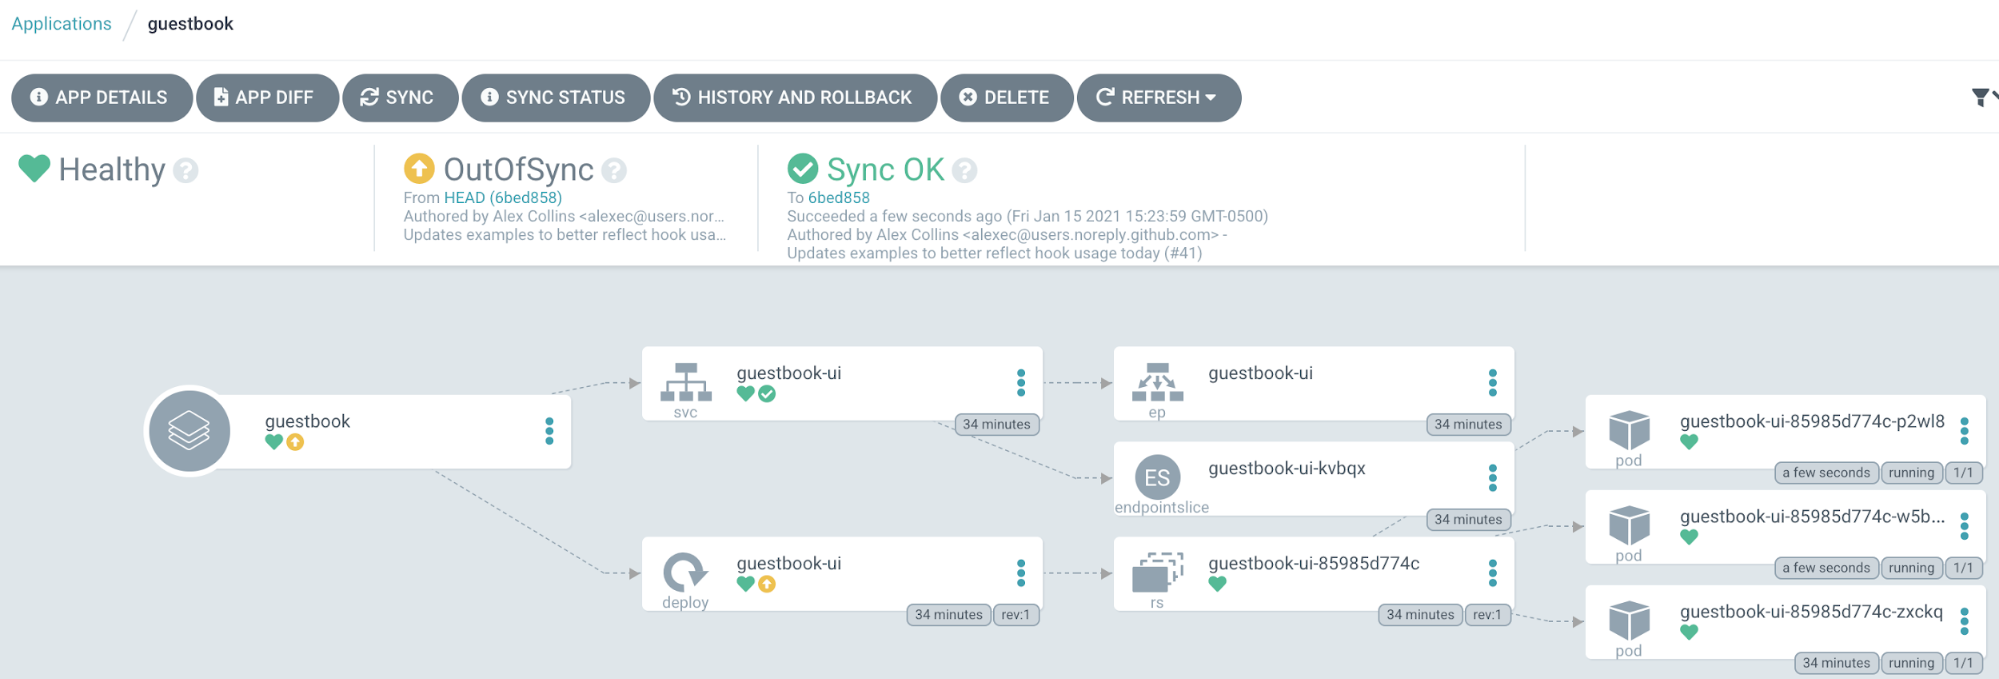
Let’s bring our environment back in sync by clicking the “Sync” button once more. Whoah! ArgoCD just deleted our two additional pods! We are now back in sync with our deployment manifest at the head of our sample repository. So, how would we correctly change our configuration such that we do not incur drift and follow GitOps best practices? You guessed it, let’s change it in Git!
Modifying the Deployment – Declaratively
Fork the argocd-example-apps repo to your own GitHub account (or clone and push it to your Git server of choice). Reconfigure your application to use your forked repository as the new repository URL value by clicking on App Details → Edit and changing the Repo URL property and choosing Save. ArgoCD will not change anything in your cluster because you’ll still be at the same commit in your new repository but now we can make some changes to our configuration.
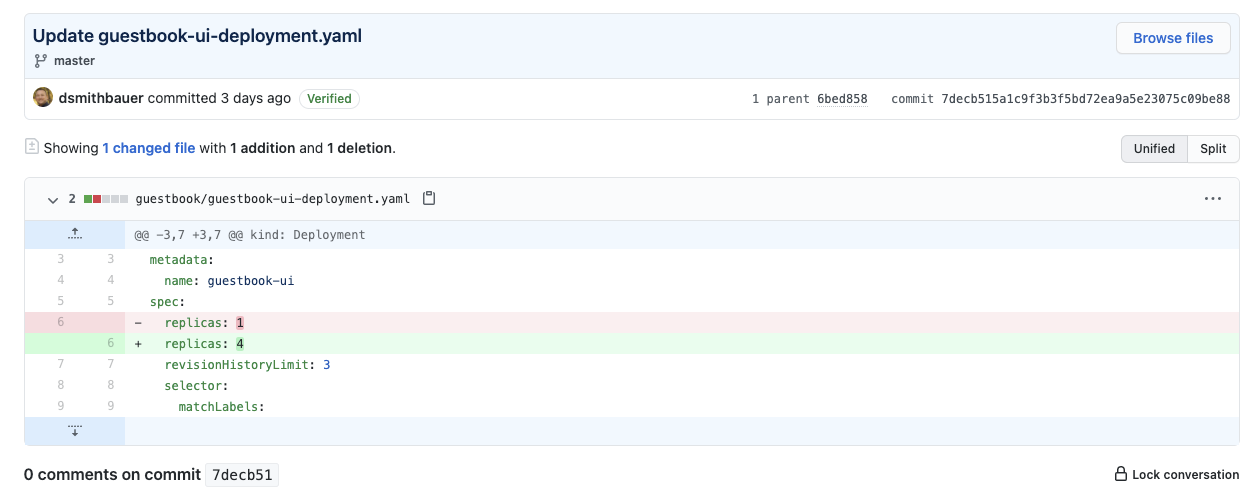
Go into your repository and change the value of replicas to 4 and save/commit your changes. This is known as a declarative modification because we are “declaring” the desired state of our environment/application and relying on ArgoCD + Kubernetes to reconcile the current state with our desired state.
In a few moments (or if you click “Refresh” in ArgoCD), you’ll see that your application is once again “OutOfSync”. Click the “Sync” button again and choose “Synchronize” at the top of the slideout. Now we have 4 pods deployed for our guestbook-ui application and we are in sync with the new Head commit of our forked repository. We just used GitOps and ArgoCD to effect a change to our environment! Using this method we can ensure our environment and application configuration remains correct and consistent. We could also enable auto-sync in ArgoCD, and it would automatically update our environment to reflect the latest commit in our Git repository.
Rollback/Revert
What if we wanted to revert our changes for some reason? Sometimes you may want to make your environment or application behave as it did at some point in the past. GitOps + ArgoCD make that a breeze. Since our Git commit history is a running log of all changes made to our environment or application configuration, we simply navigate the commit history and find the target state we desire for our system or the changes we wish to roll back. In this example, let’s roll back our replicas change. In ArgoCD choose “History and Rollback” for our Guestbook application. We can see our commit listed in the deployment history. Simply click the 3 dots of the deployment prior to our changes and choose “Rollback” and confirm.


Integration with Your Existing CI/CD Pipeline
If you already have a CI/CD pipeline for your project, it might not be readily apparent how you can integrate this new functionality into your existing pipeline. Let’s walk through one way you might approach this.
You are more than likely already building, testing, security scanning, publishing, and deploying your application changes automatically – or some subset of these, if you have a CI/CD pipeline. Since GitOps assumes control over the continuous deployment (CD) of our environments, our CI portion of the pipeline can largely remain the same, meaning we can use the same tools, processes, etc., to produce our build artifacts. However, our pipeline now only needs to ensure that our new artifacts make it to a container registry somewhere such that ArgoCD can pull them when needed to deploy our application.
ArgoCD has a section of their website dedicated to Automation from CI Pipelines. The general idea here is that we need a way to tell ArgoCD that a new version of our application exists. Since we’re already storing application configurations in a separate Git repository from our source code (see Best Practices), we simply need to update our configuration repository to tell ArgoCD to deploy a newer/different version of our application. But how do we do that?
AWS CodeBuild Example
To demonstrate this more concretely, let’s assume we’re using AWS CodeBuild and a buildspec.yml file for part of our pipeline. And, let’s assume we want to store our Docker images in AWS Elastic Container Registry (ECR). I’ll not go into detail here about how to configure these AWS resources, but let’s assume they exist and are in use already.
In our pre_build phase, let’s assume we have some commands to authenticate with our AWS ECR using something like ‘aws ecr get-login-password …’. Then, let’s assume in our build phase we build/compile (if necessary) and test our application artifacts using our language-specific tools. Let’s also assume we create a Docker container too. Finally, in our post_build phase, we may have something like this to push our container to our AWS ECR, where the environment variables point to our AWS ECR.
- echo Pushing the Docker image to ECR
- docker push $REPOSITORY_URI/$IMAGE_REPO_NAME:$IMAGE_TAG
So, how do we let ArgoCD know that there is a new container to deploy? Well, we update our configuration git repository with the new container image/tag! We can do this in our pipeline by cloning the repository, patching the deployment resource, and committing and pushing our changes back to the repository.
Note: you will need to configure an access token or other authenticated method for accessing your git repository from your pipeline.
The following is an example of what your post_build commands might look like to use the latest container image you just built with your pipeline.
- git clone https://<your_configuration_repo_url_and_access_token>.git config_repo
- cd config_repo
- kubectl patch --local -f deployment.yml -p '{"spec":{"template":{"spec":{"containers":[{"name":"<your_app_name>","image":"'$REPOSITORY_URI/$IMAGE_REPO_NAME:$IMAGE_TAG'"}]}}}}' -o yaml > new-deployment.yml
- mv new-deployment.yml deployment.yml
- git config --global user.email "<your_email>@<your_domain>.com"
- git config --global user.name "<your_ci/cd_user>"
- git commit -am "CI/CD pipeline updated $IMAGE_REPO_NAME image to new image tag"
- git push origin master
If ArgoCD auto-sync is enabled, your application will deploy within minutes of the new changes being committed to the head of your Git repository. If auto-sync is not enabled, you will now see the familiar “OutOfSync” message and you can choose when to deploy using ArgoCD’s UI or the ArgoCD CLI tool. For a more complete buildspec.yml file see here.
Cleanup
Don’t forget to clean up your test resources. Everything we’ve done locally should be contained to your local Kind cluster. Simply run the following command to delete the cluster (stopping the Docker container). If you wish, you can delete the forked ArgoCD sample repository from your GitHub account as well.
kind delete cluster
Conclusion
This post walked you through creating a local Kind cluster, installing ArgoCD, and deploying and working with a sample application using GitOps patterns. I sincerely hope this has helped you understand the benefits of GitOps and provided you with some hands-on experience with ArgoCD and Kind. There is, of course, a lot more to do and configure in a production setup of this solution, but this should serve to show the capabilities and benefits of GitOps on a very small scale.
If you have any questions or comments on this post, please feel free to reach out to me directly or leave a comment below. We’re here to help you grow your DevSecOps/GitOps capabilities and would be delighted to talk more with you. Let us know how we can help! Contact Us
See the M&S GitHub for supplementary code
—
David Smithbauer | Cloud Native Architect, DevOps Engineer
M&S Consulting