VMWare’s ESXi is a freely available type 1 (bare metal) hypervisor, here we will step through installing ESXi version 5.1.
Before Installing
The target machine needs a x86 64-bit CPU with at least two cores and a large amount of RAM. VMWare requires 2GB and suggests at least 8GB to take advantage of all features of ESXi, but most applications of virtual machine hosts will need much more than this. Our target machine has 32GB RAM.
If your target machine supports booting from USB, then load the ISO onto a thumb drive at least 1GB in size and install at boot. Otherwise use a DVD and boot from the disk drive.
Fixing Problems with Broadcom BCM57781 upon clean install
The Broadcom NetXtreme BCM57781 Gigabit Ethernet network adapter is known to have problems with a clean install of ESXi. For us, the built-in ESXi network test failed entirely. To alleviate the problem, download the driver available here:
Using diskpart to properly format drive to be read locally by ESXi
Now here is a tricky part, before you load this .zip directly onto any thumb drive, format the drive in FAT and add a partition less than 2GB. Otherwise ESXi may not recognize your USB drive. We used the Windows command line tool diskpart by entering diskpart, then entered the following commands:
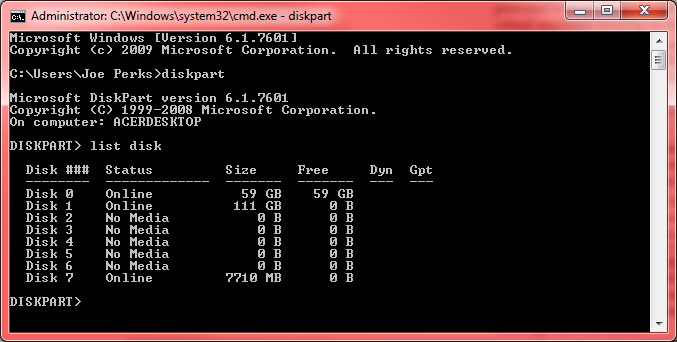
list disk displays all the disks connected, and we can see that disk 7 is a 7GB drive, the USB drive to be formatted.
Use select disk disk_number then list partition, then select partition_number to choose the partition. delete partition will delete the partition, notice we do not need to specify the partition number once we have chosen the partition.
create partition primary size=1000 creates a partition of 1000MB on our thumb drive then we format it using format fs=fat quick
ESXi 5.1 and usbarbitrator
We now have a drive that will register as 1GB in size. Drag the unpacked. zip file onto this drive. Before inserting the USB drive into the target machine where ESXi is running, access the ESXi command line with Alt + F1, then enter the command /etc/init.d/usbarbitrator stop.
This will halt the service which will prevent the host machine from mounting your USB device. Now you are free to insert your USB device.
Update the Driver
We then used the command esxcli software vib update -d OFFLINE_BUNDLE to update the driver. OFFLINE_BUNDLE refers to the absolute path to the .zip within the unpacked driver update .zip. It will have a name similar to “/vmfs/volumes/someFlashDrive/tg3-3.123b.v50.1-offline_bundle-682322/tg3-3.123b.v50.1-offline_bundle-682322.zip”. Check the version that you downloaded and moved to your USB drive.
If successful, the command line will notify you that the installation was successful, list the drivers removed and installed, and remind you to restart your ESXi host.